Every automation begins with a single question: what sets it in motion? You can design the most elegant workflow imaginable—flawless logic, perfectly structured data, seamless integrations—but none of it matters if the system does not know when to start. That starting point is the trigger, and it is the very first decision you will make when building any automated workflow.
A trigger is the event or condition that activates your automation. It is the spark that lights the fuse. Without it, your workflow is just a dormant collection of steps waiting for something to happen. Getting the trigger right is essential because it determines not only when your automation runs, but also what data it has access to at the moment of activation, how quickly it responds to the initiating event, and how reliably it operates over time.
If you have already completed your process map—and by now, you should be building that habit—then you have already identified the event that kicks off the process you are automating. This article is about translating that event into the right technical trigger for your workflow.
The Five Types of Workflow Triggers
Regardless of which automation platform you use, the fundamental categories of triggers remain consistent. The implementation details and interface may vary from one tool to another, but the underlying concepts are universal. Here are the five primary trigger types you will encounter.
Webhook Triggers
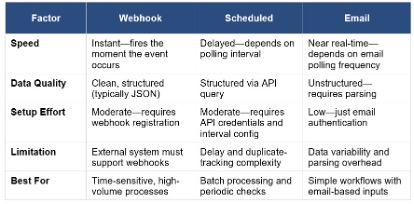
A webhook trigger activates your workflow the instant an external system sends data to a specific URL that your automation platform generates. Think of it as giving your workflow its own mailing address. Whenever another application has something to deliver—a form submission, a payment notification, a status update—it sends that data directly to your webhook’s URL, and the workflow fires immediately.
Webhooks are the gold standard for real-time automation. Because the external system pushes data to your workflow the moment an event occurs, there is virtually no delay between the triggering event and the start of your automation. The data typically arrives in a clean, structured format like JSON, which makes it straightforward to parse and use in subsequent steps.
For example, imagine you have a contact form on your website. Every time a visitor fills out the form and clicks submit, the form application sends the submitted data—name, email address, message, timestamp—to your webhook URL. Your workflow activates instantly, and every downstream node has access to that structured data from the very first step.
The primary limitation of webhooks is that the external system must support them. Not every application offers the ability to send data to a custom URL on demand. When webhook support is not available, you will need to consider alternative trigger types.
Scheduled Triggers
A scheduled trigger fires your workflow at predetermined time intervals—every fifteen minutes, once an hour, twice a day, every Monday at nine in the morning, or any other cadence you define. Rather than responding to a specific event, a scheduled trigger operates on a clock.
This type of trigger is particularly useful when you need to poll an external system for new data at regular intervals, generate periodic reports or summaries, perform routine maintenance tasks like data cleanup or synchronization, or send recurring communications such as daily briefings or weekly digests.
Suppose you want to send your team a consolidated summary of all new support tickets every morning at eight. A scheduled trigger would fire the workflow at that time each day. The workflow would then query your ticketing system’s API, pull all tickets created since the previous run, compile them into a summary, and distribute it to the team.
The tradeoff with scheduled triggers is latency. Because the workflow only runs at fixed intervals, there is always some delay between when the triggering event actually occurs and when the automation processes it. If you set a schedule to run every hour, a ticket submitted one minute after the last run will sit unprocessed for nearly sixty minutes. For time-sensitive operations, this delay may be unacceptable. For batch processing or periodic reporting, it works perfectly.
Workflow-to-Workflow Triggers
This is one of the most powerful and architecturally significant trigger types available. A workflow-to-workflow trigger allows one automation to activate another. In other words, you can build a workflow whose sole job is to be called upon by other workflows whenever a specific function is needed.
The concept is rooted in modularity. As you build more automations, you will notice that certain operations appear again and again across different workflows: sending a formatted email, logging an event to a tracking spreadsheet, posting a notification to a team chat, or enriching a contact record with additional data. Rather than rebuilding these operations from scratch every time, you can package each one as a standalone workflow with a workflow-to-workflow trigger. Any other automation that needs to send a formatted email simply calls your email workflow, passes it the necessary data, and lets it handle the rest.
This approach has profound benefits for maintainability and scalability. If you need to change how your email formatting works, you update it in one place, and every workflow that calls it automatically inherits the change. You avoid duplication, reduce errors, and build a library of reusable components that grow more valuable over time. Think of these workflows as the functions in a programming language—small, self-contained units of logic that can be invoked whenever and wherever they are needed.
External Service Triggers
Most automation platforms offer native integrations with popular third-party applications, and nearly every one of these integrations includes its own trigger. An email platform can trigger your workflow when a new message arrives. A CRM can trigger it when a deal moves to a new stage. A cloud storage service can trigger it when a file is uploaded. A messaging app can trigger it when someone sends a message to a specific channel or contact.
Under the hood, most of these external service triggers are technically webhooks that the platform has packaged into a user-friendly interface. Instead of manually configuring a webhook URL and registering it with the external application, you simply select the service, authenticate your account, and choose the event you want to listen for. The platform handles the plumbing behind the scenes.
The advantage of external service triggers is their simplicity and reliability. They require minimal technical configuration, they handle authentication and data formatting for you, and they are maintained by the automation platform, which means they stay updated as third-party APIs evolve. For most standard automation use cases—responding to new emails, reacting to form submissions, processing CRM updates—an external service trigger is the fastest and most reliable path.
Manual Triggers
A manual trigger does exactly what the name suggests: it fires the workflow only when you explicitly tell it to. You click a button, and the workflow runs. Nothing happens until you initiate it.
Manual triggers serve two primary purposes. The first and most common is testing. When you are building and debugging a workflow, you do not want it to fire automatically every time a real event occurs. A manual trigger lets you run the workflow on demand, step by step, so you can inspect the data at each stage and verify that everything behaves as expected.
The second use case is for on-demand operations that do not follow a predictable schedule or event pattern. Perhaps you have built a workflow that takes a raw data file, cleans it up, performs a series of calculations, and generates a polished report. This is not something that needs to run on a timer or in response to an external event. It is a utility—a tool you reach for when you need it. You upload your file, hit the run button, and collect the output. It still saves you significant time compared to performing the process manually, but the initiation is deliberate rather than automated.
How to Select the Right Trigger
Choosing a trigger is not arbitrary. It flows directly from the process you mapped out in your planning phase. When you documented the manual version of the workflow, there was always something that prompted you to begin—an email landing in your inbox, a clock striking a certain hour, a file appearing in a shared folder, a client sending a message. That real-world initiating event is the guide for your trigger selection.
Four factors should drive your decision.
The event source. Where does the initiating event originate? Is it coming from an email platform, a CRM, a website form, a messaging app, a file storage system, or an internal process? The source narrows your options immediately. If the event comes from a system with a native integration on your automation platform, an external service trigger is likely your best bet. If the source supports webhooks, a webhook trigger gives you real-time responsiveness.
The timing requirements. Does the automation need to respond immediately, or is a periodic check sufficient? Real-time requirements point toward webhooks or external service triggers. If the process is tolerant of some delay—say, a batch report that runs once a day—a scheduled trigger is perfectly appropriate.
The available data. What information does the triggering event carry with it? A webhook from a form submission might include every field the user filled out. A scheduled trigger that polls an API might need to query for the relevant data itself. An email trigger provides the sender, subject, body, and attachments, but extracting structured data from an email often requires additional parsing. Understanding what data is immediately available at the moment of triggering helps you plan the rest of the workflow.
The reliability requirements. How critical is it that this automation never misses an event? For high-stakes processes—financial transactions, customer-facing responses, compliance workflows—you need a trigger mechanism with robust error handling and guaranteed delivery. For lower-stakes operations—internal reports, data cleanup, periodic summaries—a slight risk of occasional missed runs may be acceptable.
Planning Your Trigger Configuration
Once you have selected the appropriate trigger type, you need to document its configuration requirements before you start building. This planning step prevents the frustrating mid-build discovery that you are missing a critical credential, that the data format is not what you expected, or that you have no fallback plan if the trigger fails.
There are four areas to document.
Authentication and credentials. What accounts, API keys, OAuth tokens, or login credentials does this trigger require? If you are connecting to Gmail, you need authorized access to the relevant email account. If you are setting up a webhook with an external ticketing system, you may need administrator-level access to that system to register the webhook URL. Identify every credential requirement upfront so there are no surprises during implementation.
Parameter settings. What configuration options need to be defined? For a scheduled trigger, this means specifying the exact interval or cron expression. For a webhook, it means generating and registering the URL. For an external service trigger, it means selecting the specific event type—for example, choosing between “new email received” and “email marked as read” in an email integration. Each trigger type has its own set of parameters, and documenting them in advance keeps the build phase smooth.
Expected data format. What does the incoming data look like the moment the trigger fires? Is it a JSON object with clearly labeled fields? A raw email body that will need parsing? An XML payload from a legacy system? Knowing the shape and structure of your initial data is essential because every subsequent node in the workflow depends on it. If you build ten steps assuming the trigger delivers a clean JSON object and then discover the actual data arrives as an unstructured email body, you have a serious problem.
Error handling and fallback plans. What happens if the trigger does not fire? What if the external system goes down, the webhook URL becomes unreachable, or the scheduled job fails silently? For mission-critical automations, you need a contingency plan. This might mean setting up a secondary trigger as a backup, implementing monitoring that alerts you when expected triggers do not arrive on schedule, or building retry logic into the workflow itself.
Practical Example: Three Triggers for the Same Process
To make these concepts concrete, consider a common scenario: you need to automate the processing of incoming customer support tickets. The workflow itself—classifying the ticket, looking up relevant information, routing it to the right team, drafting a response—remains the same regardless of how it is triggered. But the trigger you choose depends entirely on the technical capabilities of your ticketing system and your operational requirements.
Here are three different approaches to triggering the same automation.
Approach One: Webhook Trigger
In this scenario, your ticketing system natively supports webhooks. You generate a unique URL from your automation platform, register that URL in your ticketing system’s settings, and configure it to fire whenever a new ticket is created. Every time a customer submits a ticket, the system instantly sends a structured data payload—containing the ticket ID, customer details, the issue description, priority level, and a timestamp—directly to your workflow.
The strengths of this approach are significant: processing begins the instant a ticket is created, the data arrives in a clean and predictable format, and there is no ambiguity about which tickets have or have not been processed. The limitation is straightforward: if your ticketing system does not support webhooks, this option is off the table.
Approach Two: Scheduled Trigger
If your ticketing system does not offer webhook functionality but does provide API access, you can configure a scheduled trigger instead. Your workflow runs at a fixed interval—say, every fifteen minutes—and queries the ticketing system’s API for any new tickets created since the last run.
This approach works with virtually any system that exposes an API, which makes it broadly applicable. However, it introduces several complications. There is an inherent delay between when a ticket is submitted and when the workflow processes it. You need logic to track which tickets have already been handled to avoid processing duplicates. And you must carefully choose your polling interval—too frequent, and you waste resources; too infrequent, and customers wait too long for a response.
Approach Three: Email Trigger
In many organizations, support tickets arrive not through a dedicated ticketing platform but simply as emails to a shared inbox. In this case, an email trigger monitors the inbox and fires the workflow each time a new message appears.
The setup is straightforward—you authenticate the email account, and the trigger begins watching for incoming messages. However, the data you receive is far less structured than what a webhook or API would provide. An email gives you a subject line, a body of free-form text, and potentially attachments in various formats. Extracting the specific data fields your workflow needs—the customer’s account number, the nature of their issue, the urgency level—requires parsing logic that adds complexity to your automation. The variability in how different customers compose their emails means your parsing rules need to be robust enough to handle a wide range of formats and writing styles.
The Bigger Picture: Triggers and Data Flow
Understanding triggers is not just about knowing which button to press to start a workflow. It is about understanding the data that enters your automation at the very first step—because that initial data shapes everything that follows.
An automation is, at its core, a system for moving and transforming data from one point to another. The trigger is the entry point, and the data it delivers is the raw material your entire workflow operates on. If the trigger provides rich, structured data—like a JSON payload with clearly labeled fields—your downstream nodes can immediately put that data to work. If the trigger provides messy, unstructured data—like a free-form email body—you will need additional processing steps early in the workflow to extract and organize the information before you can do anything useful with it.
This is why the trigger selection process is inseparable from your overall process map. When you are planning your automation, you are not just asking “What starts this process?” You are also asking, “What data do I have at the start, what data do I still need to go get, and what format does everything need to be in for the rest of the workflow to function correctly?” Answering these questions at the planning stage—before you ever open your automation builder—saves you from countless headaches down the road.
Bringing It All Together
Triggers are deceptively simple on the surface. You pick an event, you connect it to your workflow, and the system starts running. But as you have seen throughout this article, the choice of trigger has cascading implications for your entire automation: the speed of response, the quality and structure of your incoming data, the complexity of your error handling, and the long-term reliability of the system.
The key takeaway is this: always let your process map guide your trigger selection. Identify what initiates the process in the real world. Evaluate the technical capabilities of the system where that event originates. Consider your timing requirements, your data needs, and your tolerance for failure. Then choose the trigger type that best aligns with all of those factors.
And do not overlook the power of workflow-to-workflow triggers as your automation library grows. Building small, reusable workflows that can be invoked by other workflows is one of the most impactful architectural decisions you can make. It keeps your systems modular, maintainable, and scalable—qualities that become increasingly valuable as the number and complexity of your automations expand.
With your process mapped and your trigger selected, you are now ready to move into the design and build phase with confidence, knowing exactly what starts your workflow, what data it carries, and how the rest of the system will flow from that first critical step.